How to Install Android on PC , Debug Android x86, Android x86 from Scratch
Covered: installation, and creating first Application.
Downloads (Search Google for downloads) :
- unetbootin-windows-583.exe
- android-x86-4.2-20130228.iso
- SDK ADT Bundle for Windows
Create Bootable USB
- Connect USB stick min 2G to your computer
- Run unetbootin-windows-583,
- In a bottom of window Browse to “android-x86-4.2-20130228.iso” you downloaded.
- Click OK It will create bootable usb drive.
- Click Exit on the end.
Android Installation on PC
- Move your USB stick with android image into computer you want to install Android on.
- Make sure you have set in BIOS boot from USB. I had an issue with Shuttle motherboard BIOS. in addition in BIOS had to in Advance Setting -> Hard disk Priority-> Move USB drive on top of PC HDD.
- Connect Internet to ethernet card. (Or you can use WiFi connection)
- Start boot computer. http://www.android-x86.org/documents/installhowto
- I had to re-partition my hard drive and create Linux filesystem instead of NTFS. (with NTFS startup was failing);
- format hard drive,
- GRUP-> Yes,
- Make space read/write ->Yes,
- Restart
- Remove installation USB stick;


Computer should pass screen with ANDROID banner

(with NTFS my startup stuck here)
Startup should stop on Account Settings
- On a Welcome screen with Languages choice (English US, English UK);
- Skip setup WiFi if you have connection over Ethernet card. (I tried both Ethernet and WiFi => both works);
- Follow instructions with Google Account.
- Skip unnecessary account settings
- Computer loads Android homescreen with menu buttons on bottom
- F9,F10,F11,F12 rotate screen (press and hold)

You have successfully installed Android on PC.
Connecting to development Environment (Eclipse) On your development computer under Windows 7
- unzip downloaded“SDK ADT Bundle for Windows” in any folder ( I keep all in “My Documents”)
- if you don’t have JAVA install latest from SUN
- From unzipped folder Start Eclipse from eclipse folder.
- Create new Android Project: File->New ->Android Application project.
- Follow Next until hit Finish;
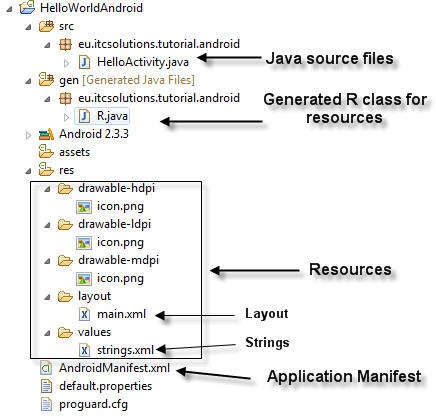
- You will see structure of project. (http://www.itcsolutions.eu/2011/08/20/android-tutorial-how-to-create-run-and-read-your-first-application-hello-world/)
- Go: Window->Show View->Devices;
If you have no device in list
Detect IP address of your device:
- On Android computer Alt+F1 go to command prompt. (Alt+F7 back to window);
- type : netcfg (I had eth0 --- 192.168.2.43 because my computer connected over ethernet port 0)
On Development computer:
- open cmd in windows
- navigate command prompt to folder where you unzip Android SDK , sdk\platform-tools folder, in my case it was c:\Users\<your User name>\My Documents\android\sdk\platform-tools\
- in command prompt type: adb connect 192.168.2.43 (specify your Androin machine address descovered erler)
- in Eclipce Device view I had appeared mobile icon with label “192.168.2.43:5555” similar to image below I found in Internet.
- Click on arrow by Debug button in menu
- Choose “Debug Configuration”
- Configuration window opens:
- select “Android Application” in a list. Right Click ->New
- Change name to any
- Project click Browse and select your current project
- Go to the “Target” tab (next to Android tab above word “Project”) and select “Always prompt to pick device”
- Click Apply
- Click Debug


if you on Android PC in command line Alt-F7 to return in window view mode;
You should see debugger window. Click yes and you can see your application on screen;
netcfg
adb kill-server
adb start-server
stop adbd
start adbd
